Easily add direct mail to your workflows!
With DOPE Marketing, you can add the power of direct mail marketing to any workflow that makes sense for you or your clients.Watch the video or follow the steps below to complete your setup.
Step 1: Login or Create an Account
If you already have an account with DOPE Marketing, you are well on your way! Just login.
If you don't have a plan yet, sign up for a demo today. We have plans starting at $250/mo + the cost of the mail.
You can send postcards, handwritten cards, custom gift boxes or even some combination of all three at at cadence you wish.
Step 2: Set up a mail automation
Next, you'll want to define what mail you want to send as part of your workflow. Options include postcards, handwritten cards, custom goodie boxes, or a combo of the three.
You'll also want to define who you want to send the mail too. There are 2 options here:
- Directly to the person in your workflow.
- The closest 5, 10, 25 or more neighbors of that person in your workflow
Lastly, set the Trigger Details to "Other" and you'll be able to use details in the URL to grab the automationID.

You can do this on your own or work with your DOPE rep. Remember, designs are included in each DOPE subscription.
Step 3: Add the action to your workflow
Once you define your trigger that matches the mail you want to send, it's time to connect the dots.
Good triggers are birthdays, milestones, prospects being cold for a certain period of time, or really any way you want to be creative.
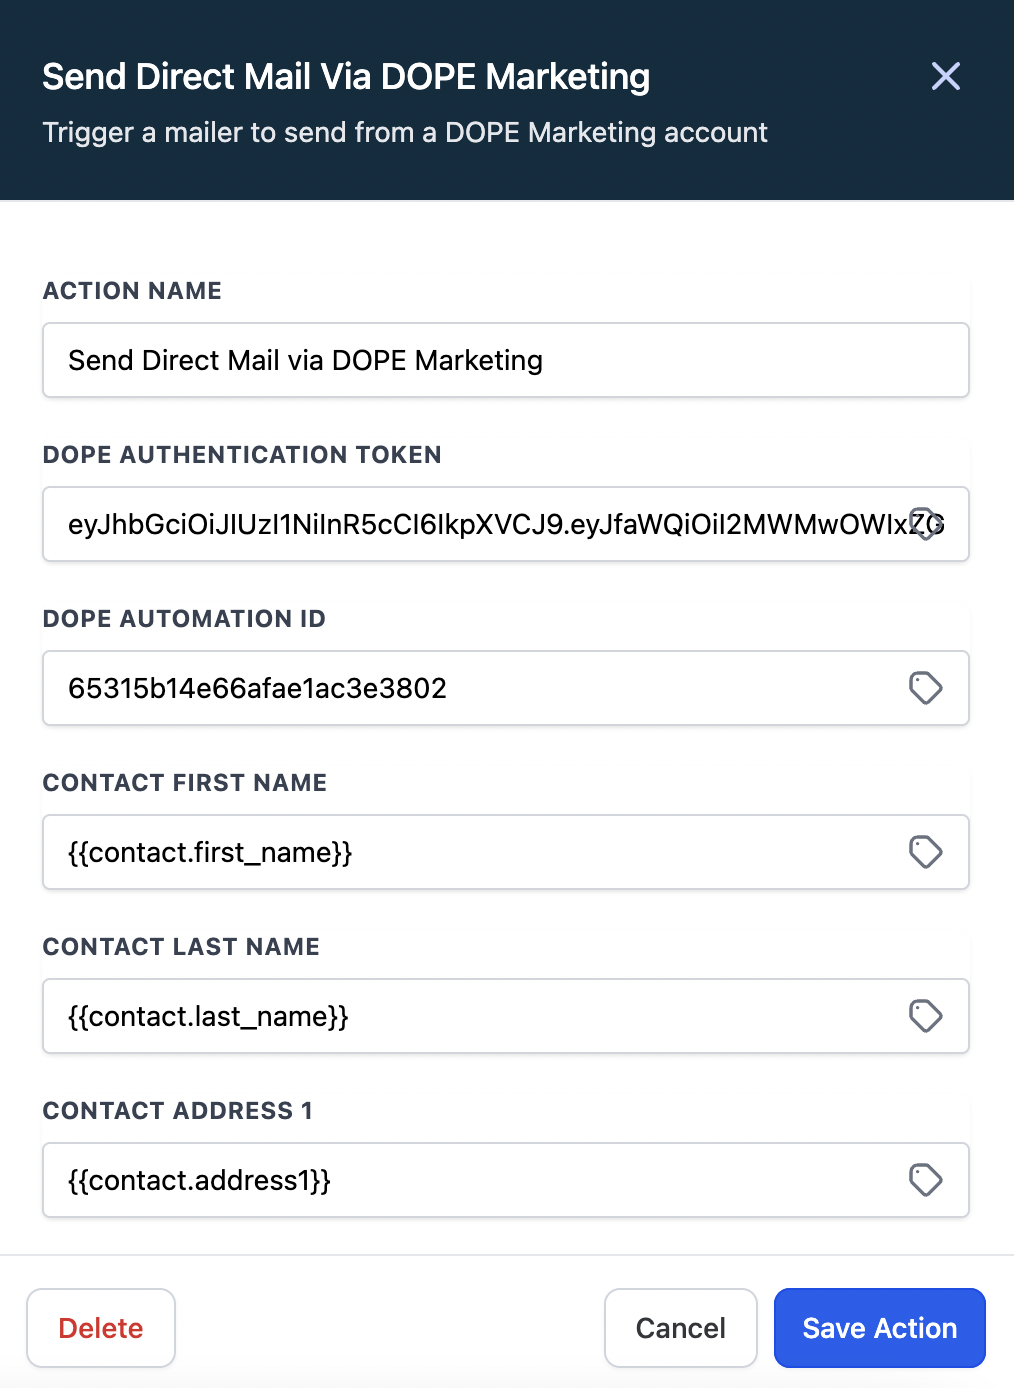
Next, add an action. Search for DOPE and click on "Send Direct Mail Via DOPE Marketing:
Step 4: Fill out the Action Details
The DOPE Authentication Token and the DOPE Automation ID are both found within side your DOPE Marketing account.
The DOPE Authentication Token
- Go to https://dope360.com/account-details and click on the "More" tab.
- Scroll to API Access section and click the "Create a Token Button"
- Name your token and click the "Copy" button next to the ID.
- Paste that token inside the Action form under "Dope Authentication Token".
DOPE Automation ID
- Navigate to the mail automation you setup inside DOPE.
- From the URL, copy just the unique ID after the last forward slash (/)

- Paste that unique ID in the Action form under "DOPE Automation ID"
Contact Details
The rest of the form will require mapping to your trigger details.
- Click on the little tag icon and select which data needs to populate each.
- You'll need a First Name, Last Name, Address1, City, State, and ZIP Code.
NOTE: You may need to create a custom field for Address2 (Suite #, Apt #, Unit #, etc) as that is not currently a feature out of the box in the contact settings. - Click "Save Action".

Step 5: Testing and go live
Last but not least, you'll want to test and make sure things are working right.
- Inside your workflow, click the "Test Workflow" button at the top of the page.
- Select a contact and click "Run Test". You should see the data going through under the "Execution Logs" tab.
- Go back to the DOPE automation, click on the "Automation List" tab and click refresh. If it went through successfully, you should see the details for the test contact coming through.
- If everything looks good, flip your DOPE Automation to "Active" and then publish your workflow.
Voila! You are now sending automated direct mail as part of your workflows
Partner Plans
If you are an agency, we have partnership plans available for both you and your clients! Just reach out to us today to apply!
Frequently Asked Questions
Is there a minimum to the amount of mail I need to send?
No! We send mail it no minimum order. If you only trigger one postcard, we'll print it and send it.
How much are postcards?
They range from $0.69-$0.99 depending on what plan you are on. They includes postage and printing. We don't like hidden fees as much as you.
Do you have strategies you can help me with?
Absolutely, we have dozens of tried and true strategies for all sorts of industries. Both a sales rep and your account manager will help here.
